Making non-team colourable areas teamcolourable
This tutorial takes the Chaos Cultist with colourable tattoo skin as an example, but can be applied to any texture in the game where you want to make an additional part teamcolourable.
It assumes no knowledge, so those who know how to extract the WTP file or already have it available can skip to the Making it Team Colourable section. All file paths are within the Dawn of War folder (e.g. C:\Program Files\THQ\Dawn of War\).
Note that some areas may be too light when copied to a teamcolourable layer, and so some tweaking of brightness levels may be needed, but this is beyond the scope of this tutorial.
Getting the files
The first step is to extract the files, so an SGA extractor tool is required. I recommend using my SGA Explorer or Dawn of War Mod Tools or Corsix's SGA Reader are alternatives. Alternatively, if you're really brave and know the folder structure, try the Command-line SGA Extractor.
Once you have your tool, open the W40kData-SharedTextures-Full.sga file found in W40K subdirectory (or WXPData-SharedTextures-Full.sga in the WXP subdirectory for Winter Assault).
With the archive opened, find the WTP for the unit you want and extract it (all WTPs are found in data/art/ebps/races/[race_name]/texture_share). Note that if you are using the Mod Packager then it doesn't have a "save one file" option!
Make sure you remember where you extracted the texture to. We'll need it for the next step - getting workable images.
Getting workable images
There are currently two WTP tools in existance. The most up to date and complete is IBBoard's Dawn of War Texture Tool, or there's the WTP Tool from Beroc that is mirrored here. If you haven't already, download one of them or you'll be able to go no further.
The rest of the tutorial will assume you are running the Texture Tool, so please use the relevant equivalent if you're using Beroc's WTP Tool.
Run up the Texture Tool, click "Extract WTP" and locate the file you extracted. When you open the file, it will create a set of WTP files with similar names, usually about half a dozen of them but it varies depending on what army painter colours are in a skin.
Most of the texture file names are self explanatory, but in brief the file ending _default.tga controls the underlying colours where no teamcolouring applies, the _default_dirt.tga file controls which areas are teamcolourable and to how much of the underlying colour shows through, and all of the other files relate directly to the Army Painter colours (note that Trim 2 was previously called Eyes) or the positioning of badges/banners.
Making it team colourable
With all of the TGA files for the texture extracted, we can now start the tutorial on how to actually change them! This is where the pictures start as well.
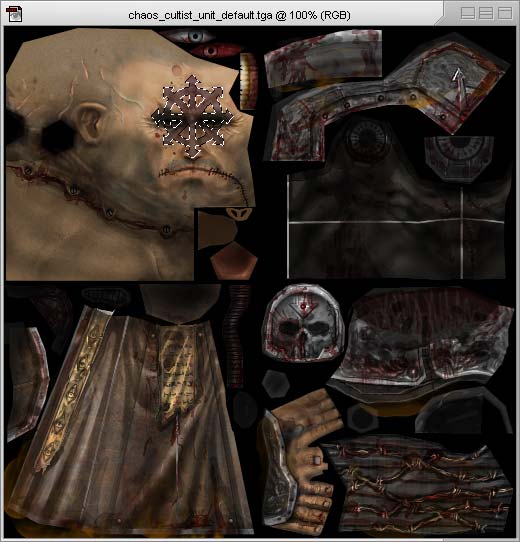
First, we need to open three TGAs. Taking the Chaos Cultist as an example, we need the chaos_cultist_unit_default.tga, chaos_cultist_unit_default_dirt.tga and, for this example, chaos_cultist_unit_default_secondary.tga. Any of the team colourable texture layers would work, but Secondary was the best choice for team colouring the tattoo.
With these textures open in your favourite art package (I use Photoshop 6, but all of this is generic editing that can be done in any program that handles TGA files) it's time to change the texture.
The first stage of the change is to go to the _default.tga image and select the area of the tattoo with the various selection tools. The circle selector and polygon lassoo-type tools are the best choice for the tattoo.
Next, copy the area and paste it into the _default_dirt.tga file in the correct place. Paint the whole of the newly pasted area black (so that none of the underlying colour shows through) but don't paint anything beyond the tattoo area.
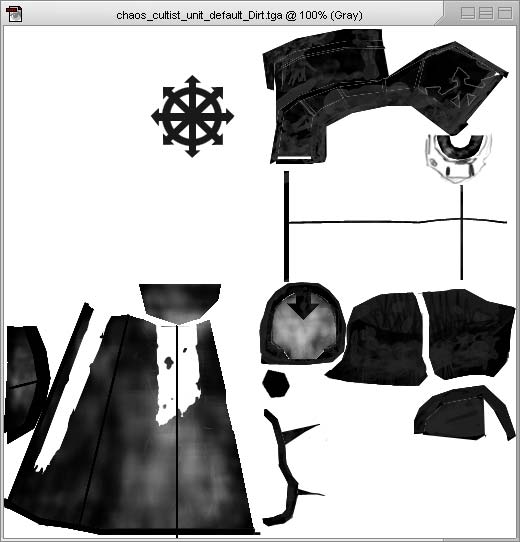
Flatten the _default_dirt.tga image (if your program uses layers) and save the file. You have now finished with the _default_dirt.tga and _default.tga files. The only step left is the actual team colouring.
Go to your teamcolour texture image (chaos_cultist_unit_default_secondary.tga in this example) and again paste the tattoo area in the correct place.

Saving the image now and recompiling it would give a perfectly teamcolourable tattoo in the cultist texture, but a minor tweak will make it look better. Very carefully darken all of the edge pixels a little, but don't make them entirely black. This gives a slightly darker teamcoloured border around the teamcolourable area, just like the idea of painting a thin dark line for definition in tabletop models.
With the tattoo added to the required layer, save the file and prepare to recreate the texture for use in game.
Recompiling the completed texture
With all of the TGA images saved and completed, the last step is to recompile the image.
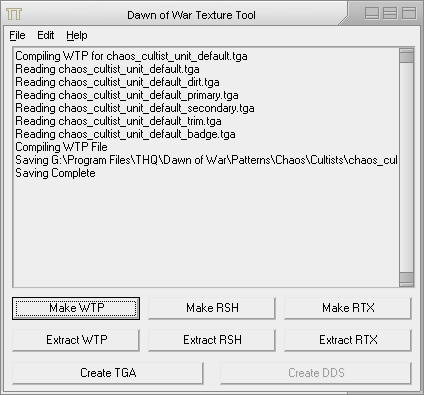
Open the Texture Tool again, if you closed it, and click on "Make WTP". It should still be pointing to the last location you extracted or compiled a file from, which should be the folder that the Cultist texture is in, if you haven't opened any other files.
When compiling, the Texture Tool should go through each layer, reading them in before compiling the final texture.
Assuming you edited the Cultist texture in the location that it needs to be (the default location that SGA Explorer/SpookyRAT extracts to), i.e. W40k\data\art\ebpsaces\chaos\texture_share, then the texture should now show up in Dawn of War for all Cultists.
If you extracted using the Mod Packager, or moved the file somewhere else to work on it, put the WTP file back in the folder you copied it from.
To see your new texture before you get into a game or a skirmish, try downloading the Dawn of War UberPainter mod or the Winter Assault UberPainter mod to show more units in the Army Painter.


